HashMap源码解析和安全性问题
概要
- hashmap的实现
- hashmap为什么是线程不安全的
- JDK8 如何修复多线程扩容Bug
hashmap的实现
1.hashmap的组成
数组+链表+红黑树
HashMap的实现使用了一个数组,每个数组项里面有一个链表的方式来实现,因为HashMap使用key的hashCode来寻找存储位置,不同的key可能具有相同的hashCode,这时候就出现哈希冲突了,也叫做哈希碰撞,为了解决哈希冲突,有开放地址方法,以及链地址方法。HashMap的实现上选取了链地址方法,也就是将哈希值一样的entry保存在同一个数组项里面,可以把一个数组项当做一个桶,桶里面装的entry的key的hashCode是一样的。在Java8中当一个桶entry数量超过8时,就会转化为红黑树
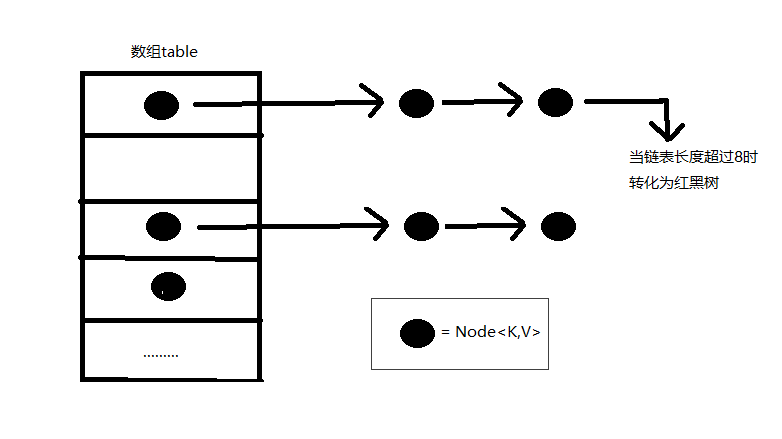
上面的图片展示了我们的描述,其中有一个非常重要的数据结构Node<K,V>,这就是实际保存我们的key-value对的数据结构,下面是这个数据结构的主要内容:
1 | //单链表结构 |
2.源码解析
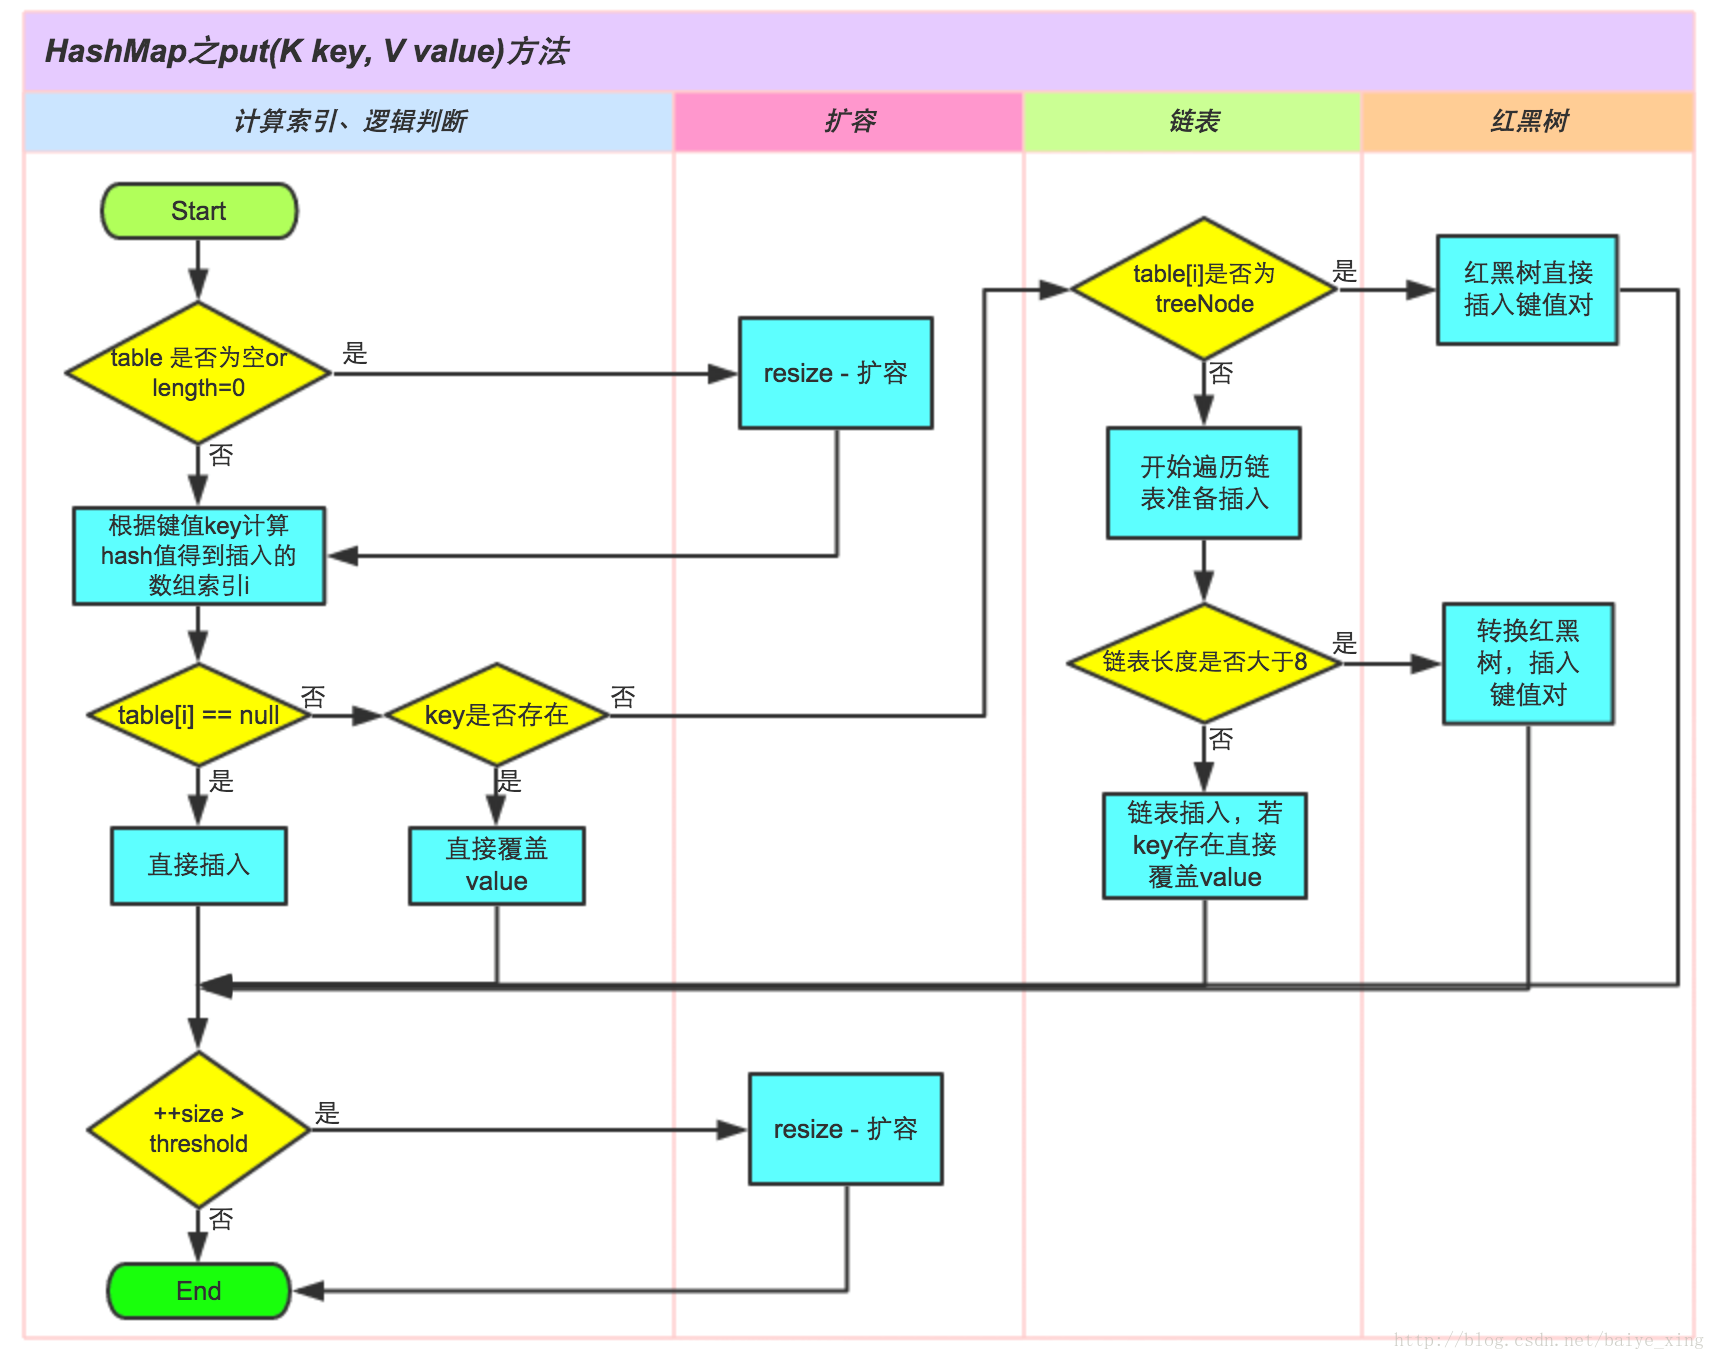
1.HashMap的put方法
1 | final V putVal(int hash, K key, V value, boolean onlyIfAbsent, |
流程图如下
2.resize机制
HashMap的扩容机制就是重新申请一个容量是当前的2倍的桶数组,然后将原先的记录逐个重新映射到新的桶里面,然后将原先的桶逐个置为null使得引用失效。
1 | final Node<K, V>[] resize() { |
3.get方法(返回指定键所映射的值)
1 | public V get(Object key) { |
4.treeifyBin方法(将容器中的node变为treeNode)
1 | final void treeifyBin(Node<K, V>[] tab, int hash) { |
5.remove方法(移除指定键的映射关系)
1 | public V remove(Object key) { |
hashmap为什么是线程不安全的
多线程环境put的时候导致的数据不一致问题
这个问题比较好想象,比如有两个线程A和B,首先A希望插入一个key-value对到HashMap中,首先计算记录所要落到的桶的索引坐标,然后获取到该桶里面的链表头结点,此时线程A的时间片用完了,而此时线程B被调度得以执行,和线程A一样执行,只不过线程B成功将记录插到了桶里面,假设线程A插入的记录计算出来的桶索引和线程B要插入的记录计算出来的桶索引是一样的,那么当线程B成功插入之后,线程A再次被调度运行时,它依然持有过期的链表头但是它对此一无所知,以至于它认为它应该这样做,如此一来就覆盖了线程B插入的记录,这样线程B插入的记录就凭空消失了,造成了数据不一致的行为。下面是一个简单的例子
1 | public class Test { |
结果如下
1 | 0/0 |
JDK8 如何修复多线程扩容Bug
源码分析上面有
- JDK8 中Node<K,V>[] resize()每次扩容哈希表大小都增倍特性,每次扩容,一个哈希桶里的元素在扩容后的位置,只会是原位置,或者原位置+原哈希表。
- 扩容后,原来哈希桶的链表被拆分为两个,两个链表中的元素都能继续维持原有的顺序。这样就算在多线程环境下同时扩容,一个线程A读取链表状态后停止工作,另一个线程B对同一链表的前几个元素进行扩容分成两个链表,此时线程A恢复工作,由于线程B对链表元素的顺序没有发生变化,所以线程A恢复工作后只是重复了拆分链表的工作,而不会因为链表已被改变顺序而导致环的生成,因此不会发生死循环的问题。
- 也就是说 JDK8 的HashMap扩容方法不但效率提升了(根据哈希值特点拆分链表,红黑树),而且还维持了扩容前后的链表顺序,从而解决了多线程扩容使链表产生环,导致死循环的问题。
