概要
Connector组成
Connector分类
Conector请求处理流程
Connector初始化流程
1.Connector组成
Connector中包含一个ProtocolHandler和Adapter
ProtocolHandler创建对应Endpoint,用来处理请求。
Adapter是Connector与Container容器之间的一个连接器。
1
2
3
4
5
6
7
8
9
10
11
12
13
14
15
16
17
18
19
20
21
22
23
24
25
26
27
28
29
30
31
32
33
34
35
36
37
38
39
40
41
42
43
44
| public class Connector extends LifecycleMBeanBase {
protected final ProtocolHandler protocolHandler;
protected Adapter adapter = null;
public Connector() {
this("org.apache.coyote.http11.Http11NioProtocol");
}
public Connector(String protocol) {
boolean aprConnector = AprLifecycleListener.isAprAvailable() &&
AprLifecycleListener.getUseAprConnector();
if ("HTTP/1.1".equals(protocol) || protocol == null) {
if (aprConnector) {
protocolHandlerClassName = "org.apache.coyote.http11.Http11AprProtocol";
} else {
protocolHandlerClassName = "org.apache.coyote.http11.Http11NioProtocol";
}
} else if ("AJP/1.3".equals(protocol)) {
if (aprConnector) {
protocolHandlerClassName = "org.apache.coyote.ajp.AjpAprProtocol";
} else {
protocolHandlerClassName = "org.apache.coyote.ajp.AjpNioProtocol";
}
} else {
protocolHandlerClassName = protocol;
}
ProtocolHandler p = null;
try {
Class<?> clazz = Class.forName(protocolHandlerClassName);
p = (ProtocolHandler) clazz.getConstructor().newInstance();
} catch (Exception e) {
log.error(sm.getString(
"coyoteConnector.protocolHandlerInstantiationFailed"), e);
} finally {
this.protocolHandler = p;
}
...
}
}
|
2.Connector分类
可以分为以下三类
- Http Connector:解析HTTP请求,又分为BIO Http Connector和NIO Http Connector,即阻塞IO Connector和非阻塞IO Connector。本文主要分析NIO Http Connector的实现过程。
- APR HTTP Connector:解析HTTP请求,用C实现,通过JNI调用的。主要提升对静态资源(如HTML、图片、CSS、JS等)的访问性能。
- AJP Connector:基于AJP协议,用于Tomcat与HTTP服务器通信定制的协议,能提供较高的通信速度和效率。如与Apache服务器集成时,采用这个协议。
具体要使用哪种Connector可以在server.xml文件中通过protocol属性配置如下:
1
2
3
| <Connector port="8080" protocol="org.apache.coyote.http11.Http11AprProtocol"
connectionTimeout="20000"
redirectPort="8443" />
|
每一类Connector对应这一种protocolHandler,protocolHandler用来监听服务器某个端口的请求,但并不处理(处理请求由容器组件完成)。
3.Conector请求处理流程
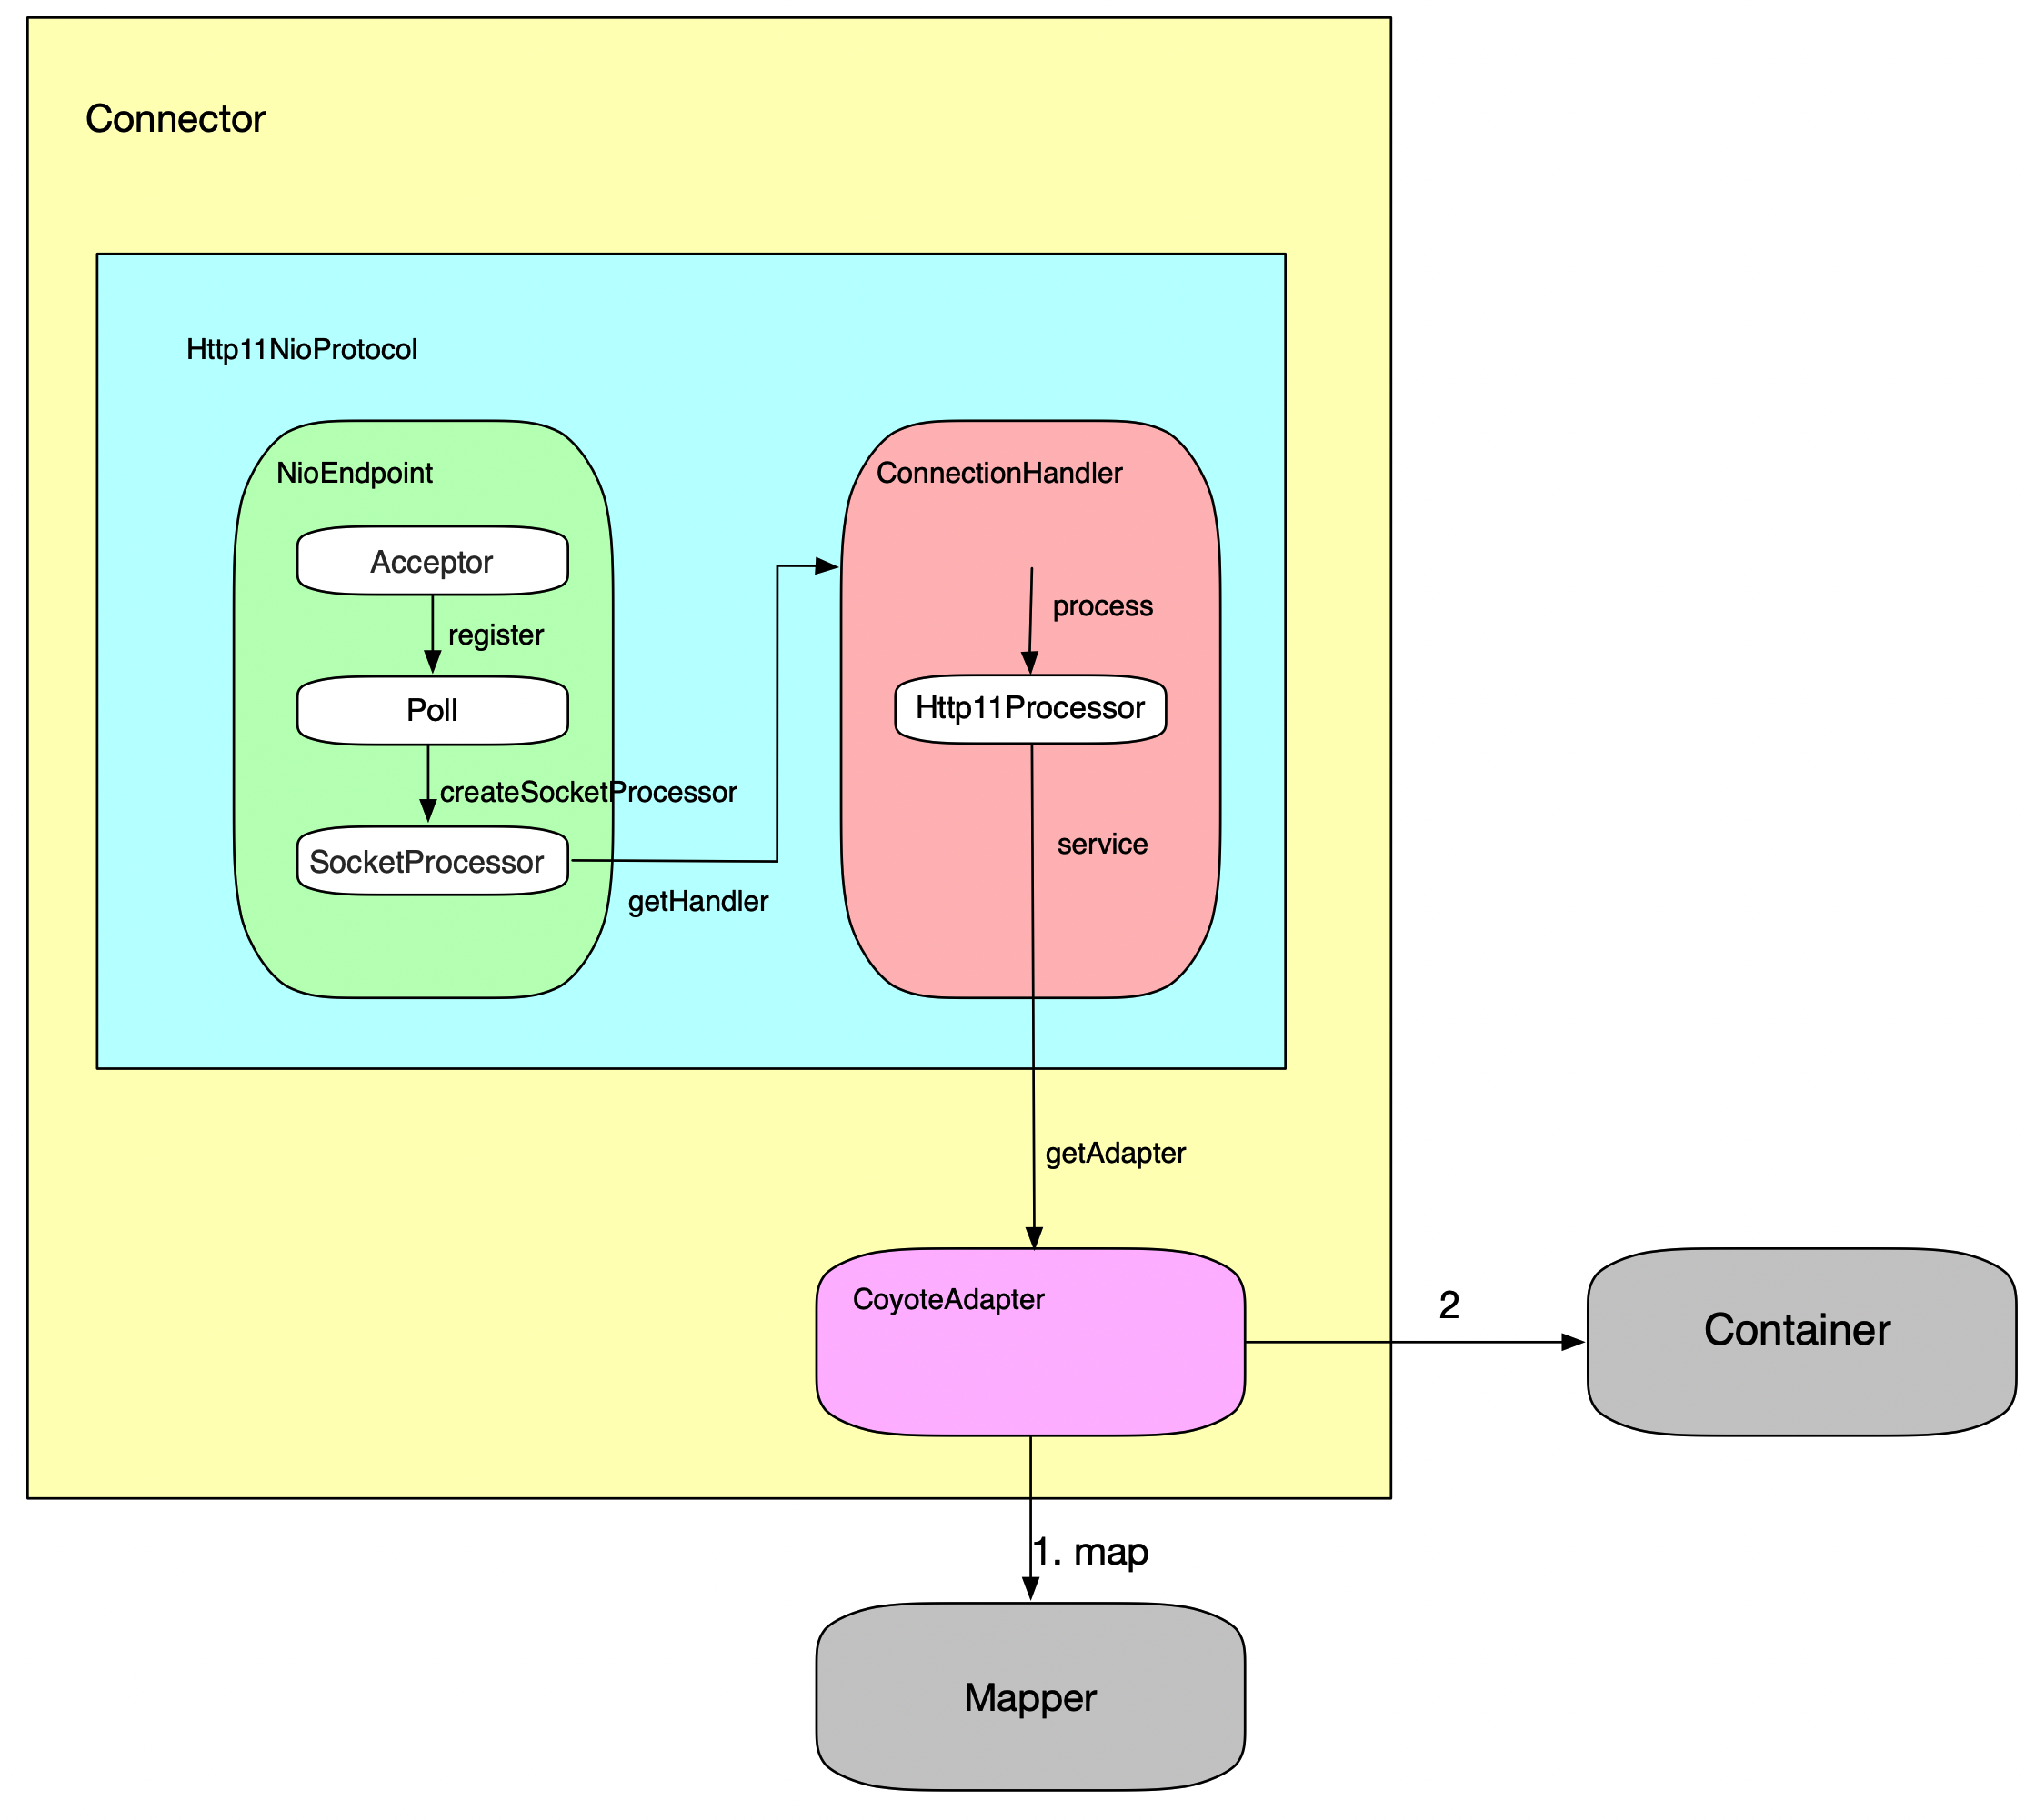
- Acceptor为监听线程,调用serverSocketAccept()阻塞,本质上调用ServerSocketChannel.accept()
- Acceptor将接受的Socket封装成PollerEvent,调用Poll的register方法放到Poll的同步队列中
- Poller线程循环从队列获取数据,然后把socketWrapper包装成SocketProcessor
- SocketProcessor调用getHandler()获取对应的ConnectionHandler
- ConnectionHandler把socket交由Http11Processor处理,解析http的Header和Body
- Http11Processor调用service()把包装好的request和response传给CoyoteAdapter
- CoyoteAdapter会通过Mapper把请求对应的session、servlet等关联好,准备传给Containe
4.Connector初始化流程
本文以sprng boot为例
1
2
3
4
5
6
7
8
9
10
11
12
13
14
15
16
17
18
19
|
public ConfigurableApplicationContext run(String... args) {
...
try {
ApplicationArguments applicationArguments = new DefaultApplicationArguments(args);
ConfigurableEnvironment environment = prepareEnvironment(listeners, applicationArguments);
configureIgnoreBeanInfo(environment);
Banner printedBanner = printBanner(environment);
context = createApplicationContext();
exceptionReporters = getSpringFactoriesInstances(SpringBootExceptionReporter.class,
new Class[] { ConfigurableApplicationContext.class }, context);
prepareContext(context, environment, listeners, applicationArguments, printedBanner);
refreshContext(context);
afterRefresh(context, applicationArguments);
stopWatch.stop();
.....
return context;
}
|
在ServletWebServerApplicationContext的onRefresh()方会创建servlet容器
1
2
3
4
5
6
7
8
9
10
| protected void onRefresh() {
super.onRefresh();
try {
createWebServer();
}
catch (Throwable ex) {
throw new ApplicationContextException("Unable to start web server", ex);
}
}
|
在TomcatServletWebServerFactory#getWebServer()中会创建tomcat
1
2
3
4
5
6
7
8
9
10
11
12
13
14
15
16
17
18
19
20
21
22
23
| public WebServer getWebServer(ServletContextInitializer... initializers) {
if (this.disableMBeanRegistry) {
Registry.disableRegistry();
}
Tomcat tomcat = new Tomcat();
File baseDir = (this.baseDirectory != null) ? this.baseDirectory : createTempDir("tomcat");
tomcat.setBaseDir(baseDir.getAbsolutePath());
Connector connector = new Connector(this.protocol);
connector.setThrowOnFailure(true);
tomcat.getService().addConnector(connector);
customizeConnector(connector);
tomcat.setConnector(connector);
tomcat.getHost().setAutoDeploy(false);
configureEngine(tomcat.getEngine());
for (Connector additionalConnector : this.additionalTomcatConnectors) {
tomcat.getService().addConnector(additionalConnector);
}
prepareContext(tomcat.getHost(), initializers);
return getTomcatWebServer(tomcat);
}
|
在增加的过程中会启动connetot
1
2
3
4
5
6
7
8
9
10
11
12
13
14
15
16
17
18
19
20
21
22
23
| public void addConnector(Connector connector) {
synchronized (connectorsLock) {
connector.setService(this);
Connector results[] = new Connector[connectors.length + 1];
System.arraycopy(connectors, 0, results, 0, connectors.length);
results[connectors.length] = connector;
connectors = results;
}
try {
if (getState().isAvailable()) {
connector.start();
}
} catch (LifecycleException e) {
throw new IllegalArgumentException(
sm.getString("standardService.connector.startFailed", connector), e);
}
support.firePropertyChange("connector", null, connector);
}
|
下面以Http11NioProtocol为例分析启动初始化过程:
在Connector的startInternal()方法中启动了protocolHandler,代码如下:
1
2
3
4
5
6
7
8
9
10
11
12
13
14
| protected void startInternal() throws LifecycleException {
if (getPortWithOffset() < 0) {
throw new LifecycleException(sm.getString(
"coyoteConnector.invalidPort", Integer.valueOf(getPortWithOffset())));
}
setState(LifecycleState.STARTING);
try {
protocolHandler.start();
} catch (Exception e) {
throw new LifecycleException(
sm.getString("coyoteConnector.protocolHandlerStartFailed"), e);
}
}
|
在AbstractProtocol的start()方法中启动endpoint
1
2
3
4
5
6
7
8
9
10
11
12
13
14
15
16
17
18
| @Override
public void start() throws Exception {
if (getLog().isInfoEnabled()) {
getLog().info(sm.getString("abstractProtocolHandler.start", getName()));
logPortOffset();
}
endpoint.start();
monitorFuture = getUtilityExecutor().scheduleWithFixedDelay(
new Runnable() {
@Override
public void run() {
if (!isPaused()) {
startAsyncTimeout();
}
}
}, 0, 60, TimeUnit.SECONDS);
}
|
在NioEndpoint的startInternal()方法,创建creating acceptor, poller threads.
1
2
3
4
5
6
7
8
9
10
11
12
13
14
15
16
17
18
19
20
21
22
23
24
25
26
27
28
29
30
31
32
33
34
35
36
37
38
39
40
41
42
43
44
|
@Override
public void startInternal() throws Exception {
if (!running) {
running = true;
paused = false;
if (socketProperties.getProcessorCache() != 0) {
processorCache = new SynchronizedStack<>(SynchronizedStack.DEFAULT_SIZE,
socketProperties.getProcessorCache());
}
if (socketProperties.getEventCache() != 0) {
eventCache = new SynchronizedStack<>(SynchronizedStack.DEFAULT_SIZE,
socketProperties.getEventCache());
}
if (socketProperties.getBufferPool() != 0) {
nioChannels = new SynchronizedStack<>(SynchronizedStack.DEFAULT_SIZE,
socketProperties.getBufferPool());
}
if (getExecutor() == null) {
createExecutor();
}
initializeConnectionLatch();
poller = new Poller();
Thread pollerThread = new Thread(poller, getName() + "-ClientPoller");
pollerThread.setPriority(threadPriority);
pollerThread.setDaemon(true);
pollerThread.start();
startAcceptorThread();
}
}
|
5.总结
Connector负责创建Request和Response
Connector初始化时会创建对应的Endpoint;Endpoint监听一个指定端口,负责对请求报文的解析和响应报文组装
Connector初始化时会创建对应的Adapter;Adapter将Request,Response交给给容器处理
